Tools
The Tools section of the project is where you define what the AI can do — fetch data, fire backend actions, ask the user to upload a file, render a card, check calendar availability. Each tool you create here becomes available to the AI for matching against user messages.
This page is a field-by-field reference for the tool builder form. For the runtime side — how your app handles a tool the AI invoked — see the Handling Tools guide.
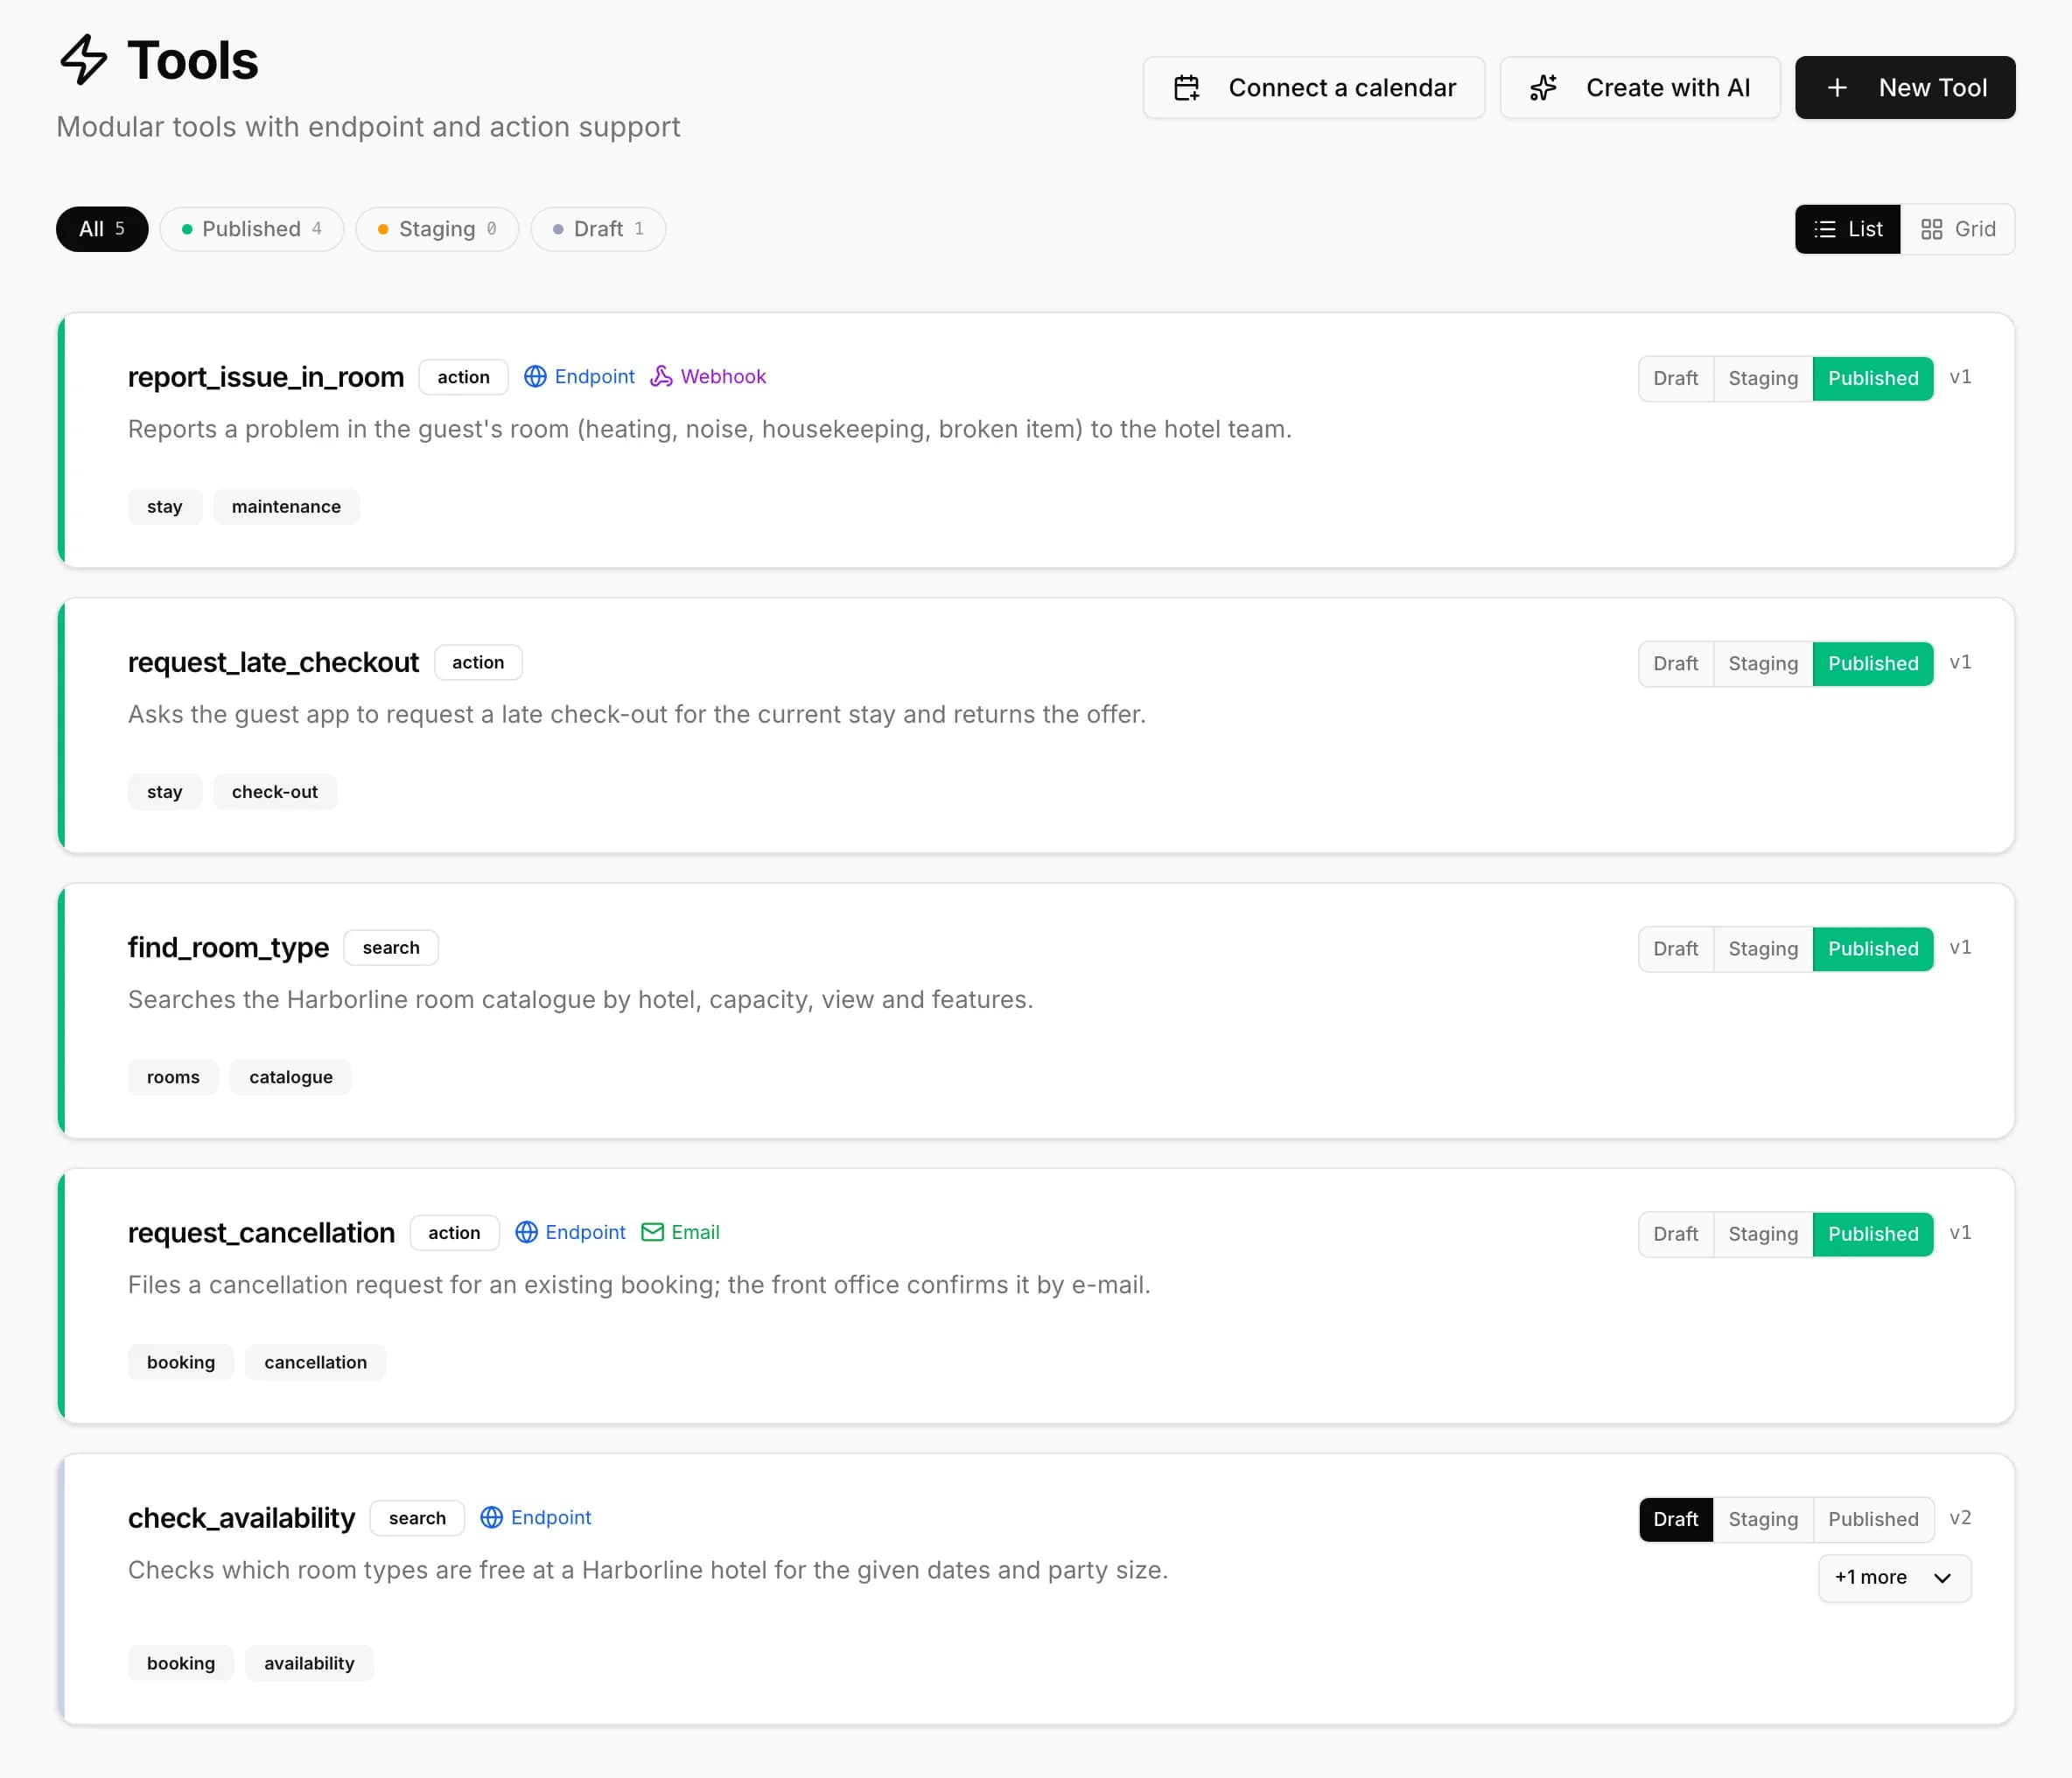
Creating a Tool
There are three ways to start a new tool, from the tools list:
| Entry point | What you get |
|---|---|
| New Tool | Opens a blank tool editor. Fill in at minimum Name, Description, and Execution mode, then save. |
| Create with AI | Describe the tool in plain language and let AI draft it — see Create with AI. |
| Connect a calendar | A guided setup for a Google Calendar availability/booking tool — see Calendar under Execution Mode below. |
Saving a tool — through any of the three entry points — adds it to your project, and it’s available to the assistant as soon as it’s Enabled (see Available In / Enabled below):
- New Tool tools get a Published version the moment you save — the tools list’s Draft/Staging/Published control (see Versions) shows “Published” right away, and since they’re Enabled by default, they’re immediately live.
- Create with AI tools get a Draft version on save, so they stay hidden from the assistant until you review them and move them to Published. They’re saved Enabled and marked with an AI badge on the tools list.
- Connect a calendar tools also get a Draft version, and are saved disabled too — review the connection and configuration, then publish the version and turn Enabled on.
The list and grid views can be filtered by status (All / Published / Staging / Draft) and switched between List and Grid layout.
Identity & Matching
| Form field | What it does |
|---|---|
| Name | Unique key per project. The AI emits this back to the SDK to identify which tool was invoked. |
| Description | The full behavioral specification of the tool — read by the chat LLM after the tool has been selected. Include what the tool does, multi-stage flows, parameter rules, response phrasing, anything the AI needs to use the tool correctly. Up to 6000 characters. The single most important field — vague descriptions cause both false matches and incorrect execution. If the description is getting too long to be useful, link a Knowledge Document instead of stuffing everything in here. |
| When to use | Optional short intent hint (max 500 chars) read only by the selector (the lightweight LLM that decides which tool to invoke). Use it when the full Description is long and you want a concise signal for tool routing. Leave empty if Description’s first lines already make intent clear. The chat LLM never sees this field. |
| Category | Grouping label, included in the tool’s prompt block alongside Tags — not a strong signal like Description, but not withheld from the AI either. |
| Tags | Free-form tags the AI sees alongside the description. Useful for adding extra matching signals. |
| Usage examples | Example user phrasings that should fire this tool. Treated as positive training signals at matching time. |
Description vs When-to-use
Tool invocation runs in two LLM phases, and the two fields target different phases:
| Phase | What runs | Reads description? | Reads whenToUse? |
|---|---|---|---|
| Selector | A small, fast LLM picks which tool (if any) fits the user’s message. | First line only (fallback) | Full text (preferred when set) |
| Chat | The main LLM runs the selected tool — extracts parameters, follows your protocol, writes the user-facing reply. | Full text | Not used |
Practical guidance:
- Always fill
Descriptionthoroughly. This is what governs how the tool actually behaves at runtime — multi-stage approval flows, “ask for missing detail before confirming” rules, response wording, etc. - Fill
When to useonly when the Description is too long for the selector to skim quickly. Two-three short bullet-style lines of “fire when…” / “skip when…” are ideal. AddingwhenToUsedoes not change chat-phase behavior — it only sharpens the selector. - A common mistake is treating
whenToUseas additive context for the main chat LLM. It isn’t. If the chat LLM needs to know something, it goes inDescription.
Execution Mode
The biggest behavioral choice — pick the mode based on where the tool actually runs and who writes the final reply.
| Mode | Who runs the tool | Who writes the final reply | Use when |
|---|---|---|---|
| Custom (default) | The app, in onToolSuggested | The app, via addResponse(data, tool) | The tool result is purely a UI render — show a card, open a modal, navigate. Data is fetched client-side; the AI only suggests the tool. |
| Server | Qafka backend | AI, in a follow-up turn | The backend auto-fetches the endpoint (public endpoints only — no auth headers); the AI interprets the data and writes the response. The SDK shows a short “loading message” bridge while the backend works. |
| Custom with AI | The app, in onToolSuggested | AI, in a follow-up turn | Data lives only on the client (e.g. local DB, authenticated request, user-entered form) but you want the AI to summarize it into a natural reply. The app fetches with its own credentials, posts the result back to the backend for a second LLM turn. |
| Static Data | Qafka backend, against an uploaded file | AI | No live endpoint at all — the AI searches a file you upload (JSON, CSV, or Excel) with a mix of exact and semantic search. Good for catalogs, price lists, FAQ-style tables. See Static Data below. |
| Calendar | Qafka backend, against a connected Google Calendar | AI | Checks availability and books appointments on a connected Google Calendar. Created via the Connect a calendar flow. See Calendar below. |
The chosen mode is injected into the system prompt so the AI knows whether to write a final reply itself or just a bridge sentence.
For Server mode, the editor offers a Test endpoint button that fires a real request to the URL you configured and shows the response (or a specific failure reason — timeout, network error, invalid URL, invalid JSON, response over 5 MB, unexpected content type, or an HTTP 4xx/5xx). You can reuse the test response as the sample payload for the response renderer.
For Server and Custom with AI modes, you can set a Loading Message — a plain text string shown in the chat (text) or as a voice pill (voice) while the async work is in flight.
Static Data
Upload a JSON, CSV, or Excel file once the tool has been saved (it needs an ID first). After upload, the dashboard lets you preview the schema and pick a sheet (for Excel), then assign a role to each column:
| Role | What it does |
|---|---|
| Not used | Column is ignored. |
| Exact filter (not embedded) | Used for exact-match filtering; not embedded, so it doesn’t participate in semantic search. |
| Semantic — short/key text | Embedded for semantic search; use for short, key-like text. |
| Semantic — long free text | Embedded for semantic search; use for longer free text. |
Independently of its search role, a column can also be flagged Include in answer so its value is returned to the AI as payload even if it isn’t searched or filtered on.
Other settings: Max results (topK) caps how many rows come back; Similarity threshold tunes semantic matching strictness; Result framing hint is a free-text instruction for how the AI should present the results (e.g. “Show as a short list with price and name only”). Expose tool definition to answer turn is on by default for Static Data tools — see Endpoint below for what that toggle does.
Beyond row search, the AI can also request an aggregation — count, sum, average, minimum, or maximum, optionally grouped by another column — instead of returning individual rows. Sum/avg/min/max and groupBy can only target columns you’ve flagged as Exact filter; a plain count works even with no exact-filter columns configured.
Large files trigger a warning that embedding many rows increases ingest time and token cost — consider narrowing the file first. Importing runs in the background and can take a few minutes for larger files.
Calendar
The Connect a calendar flow walks through:
- Connect — sign in with Google to authorize a calendar connection for the project.
- Pick calendar — choose which calendar (including the account’s primary calendar) this tool reads and writes.
- Configure — set the slot duration, timezone, how many days ahead bookings are allowed, working hours per day of the week (or mark a day closed), and which fields to collect from the user before booking (name and email are always collected; phone and a free-text note are optional).
The resulting tool checks availability and books appointments on the connected calendar; the AI extracts an action parameter (check_availability or book), the selected slot, and the collected fields. It’s created with Risk level: Medium, Requires confirmation on, Platform: Web & App, and saved disabled with its first version as Draft (see Creating a Tool) — it stays invisible to the assistant until you review it, publish the version, and turn on Enabled (see Available In / Enabled). Its Web access still defaults to Closed on web, same as any other tool — set it to “Open on web (incl. anonymous)” if you want visitors on your website to be able to book through it, keeping in mind that opens booking to anonymous traffic. If the Google connection is later revoked, the tool’s edit screen shows a warning and a reconnect action.
Parameters
In the Parameters section, declare each input the AI should extract for this tool. For every parameter:
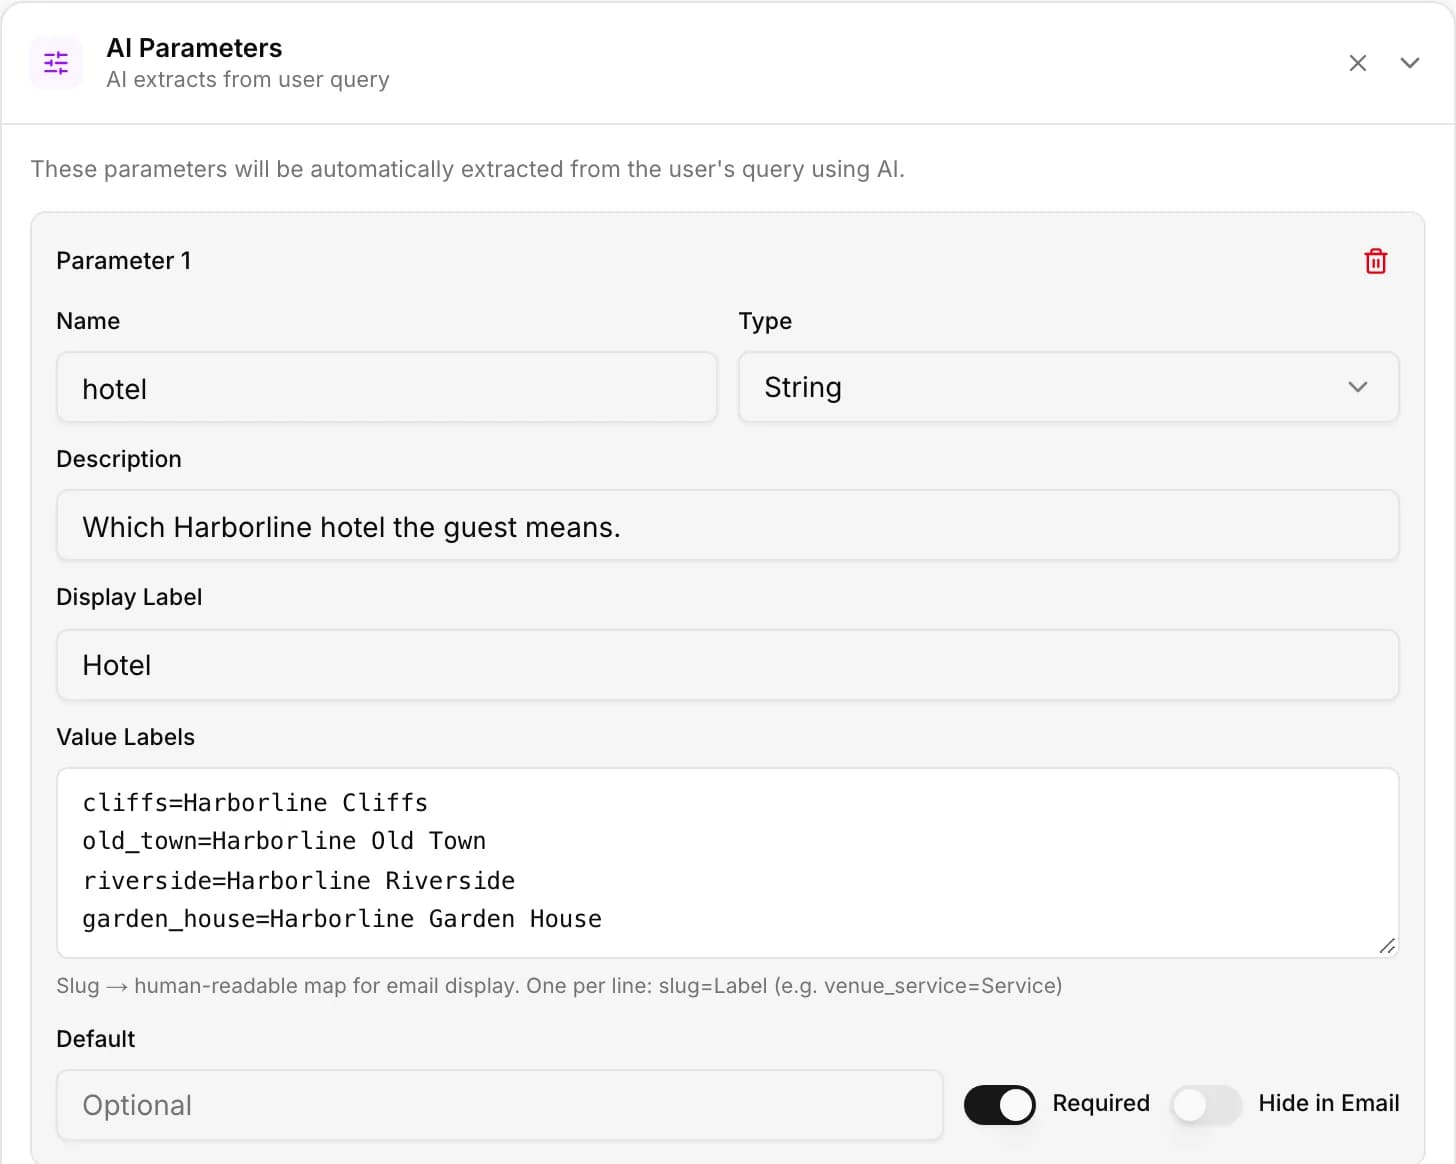
| Form field | What it does |
|---|---|
| Name | The key the AI emits back when calling the tool (e.g. productId). Used as-is in the SDK’s onToolSuggested callback under tool.params. |
| Type | string, number, or boolean. |
| Source | An informational label for how you intend the value to be filled: AI, Context (SDK runtime context), or User Input. It’s a note for your own reference — it doesn’t change how the value is actually filled at runtime. |
| Required | If on, and the AI can’t extract a value, the AI will ask the user a follow-up question to get it. |
| Description | Tells the AI what to extract or generate. The single most important field after Name — be specific. |
| Default value | Used when the AI doesn’t extract a value. For Server mode, a required parameter skips the follow-up prompt if it has a default. Supports template variables — see Template Variables below. |
| Label | Human-readable display name shown in the dashboard and used by email actions. Falls back to Name when empty. |
| Value Labels (enumLabels) | Slug → human-readable map for enum-style values, used only for email/dashboard display (e.g. the AI keeps emitting support_request, the email shows “Support Request”). One entry per line: slug=Label. |
| Hide in Email | The AI still populates this parameter, but it’s excluded from the email body’s details section. |
The AI pulls parameters from two places: the user’s message and whatever the SDK passes in its runtime context object. There’s no per-parameter “pull this key from context” wiring beyond the Source label above — if a value lives in context with a clear name, the AI will pick it up automatically.
Template Variables
Some parameters need values the AI shouldn’t generate — random tracking numbers, IDs, timestamps, fields pulled from the SDK’s userContext. Writing rules like “generate a random 10-digit number” in the description doesn’t work well: LLMs have heavy sample bias when asked for random values (you’ll see the same digit prefixes recurring). For these cases, write a template variable in the parameter’s Default value field — the server resolves it. The AI is never told the resolved value in the prompt: whatever value the AI extracts or generates for that parameter at chat time is silently replaced with the server-resolved value after the AI’s response is parsed, so the parameter you receive is guaranteed to be the resolved one regardless of what the model wrote.
A {{system.*}} value resolved this way is memoized per conversation, tool, and parameter — the same value is reused for the rest of that conversation, not regenerated on every invocation. If you need a fresh value on every single invocation (a per-complaint tracking number, for instance), use the dedicated Tracking ID Format field instead, which resolves fresh each time.
Syntax: {{namespace.key}} (mustache style — distinct from the single-brace {paramName} substitution used in endpoint URLs).
| Token | Resolves to |
|---|---|
{{system.uuid}} | UUID v4 |
{{system.id10}} | 10-character URL-safe alphanumeric ID |
{{system.digits10}} | 10 random digits |
{{system.trackingDefault}} | Default tracking ID format TRK-<base36 epoch>-<4 hex> — time-prefixed, used as the fallback when Tracking ID Format is left empty |
{{system.timestamp}} | ISO 8601 timestamp |
{{system.ymd}} | Date in YYYY-MM-DD format |
{{user.<key>}} | Any field from the SDK’s runtime userContext (e.g. {{user.firstName}}, {{user.userId}}) |
{{endUser.id}} | The endUserId the SDK passed for this session |
{{endUser.data.<path>}} | A nested field from the SDK’s endUserData blob (e.g. {{endUser.data.profile.email}}) |
{{tool.trackingId}} | The tool’s resolved tracking ID for this invocation — see Tracking ID Format. |
Use sites: these {{namespace.key}} tokens work in any string field admins write — the parameter Default value, the email action’s Subject prefix, and the webhook URL and headers. The endpoint URL is different: it only substitutes single-brace {paramName} placeholders from the tool’s extracted/default parameter values (see Endpoint above), not {{...}} tokens directly. To use a resolved value (like a tracking ID) in the endpoint URL, put the {{...}} token in that parameter’s Default value and reference the parameter as {paramName} in the URL — the resolved value overrides whatever the AI extracted. The tool’s Description also has its tokens resolved, but that text is sent to the LLM as prompt content — so {{tool.trackingId}} there is exactly how the AI learns to quote a tracking number (see Tracking ID Format), but avoid putting {{user.*}} / {{endUser.*}} tokens carrying sensitive data in Description if you don’t want that value reaching the model.
What to know:
- Recursion is disabled — values produced by token resolution aren’t re-scanned for tokens. Users can’t smuggle template syntax through their chat messages.
{{user.*}}and{{endUser.*}}only read data the SDK already passed in — no extra DB lookups, so adding a template token never widens the data the server can see.- Unknown or unresolvable tokens resolve to an empty string.
Endpoint (Optional)
If the tool maps to a backend HTTP call, switch on Endpoint and fill in:
| Form field | What it does |
|---|---|
| Method | GET, POST, PUT, DELETE, or PATCH. |
| URL | The endpoint URL. Parameter names in {curly} braces get substituted from the extracted parameters (e.g. https://api.example.com/products/{productId}). |
| Body template | For POST/PUT, the JSON shape to send. Same {paramName} substitution rules apply. |
| Required context | A list of keys that must exist in the SDK’s runtime context for this tool to be eligible. Acts as a gate — if any required key is missing, the AI never sees the tool that turn. Useful for tools that only make sense on certain screens (e.g. require productId so the tool only fires on a product detail page). |
| Expose tool definition to answer turn | The answer-writing turn sees this tool’s description and the actual call parameters. Enable when the description contains answer-formatting rules (e.g. link format). Adds the full description to every call — increases token usage. |
Multi-Step Flows
Some tools collect data over several turns (e.g. “book an appointment” needs date, then service, then user confirmation). In the Steps section, add a row per milestone:
| Form field | What it does |
|---|---|
| Key | Step identifier. |
| Description | What this step represents. The AI uses it to decide when to emit the step. |
| Required fields | Parameter names that must be collected for this step to fire. The step triggers as soon as the AI has all of them. |
| Actions | Optional side-effects to run when this step completes — same action types as Backend Actions below. Useful for “send a confirmation email when complete fires”. |
Step completion is reported to the SDK via the onStepCompleted callback.
File Input & Document Extraction
If the tool needs a file from the user (an invoice PDF, a photo, etc.), switch on File Input and fill in:
| Form field | What it does |
|---|---|
| Accepted MIME types | Which file types are allowed (e.g. image/jpeg, image/png, application/pdf). |
| Max size | Upper bound on the uploaded file, chosen from 1 MB / 5 MB / 10 MB. |
| Sources | Which pickers the SDK should offer — any combination of camera, gallery, file. |
| Webhook delivery format | Default file delivery format for webhook actions: url (signed URL), base64 (inlined), or formdata (multipart). The webhook action’s own File Delivery Format setting overrides this; this field is this tool’s fallback. |
To run AI extraction on the uploaded file, also switch on Document Extractor and add:
| Form field | What it does |
|---|---|
| Prompt | Free-form instruction to the extraction LLM (e.g. “Extract invoice fields from this document”). |
| Fields | The structured fields you want pulled out — name, type (string / number / boolean), and whether each is required. |
| Model Override | Optional — leave empty to use the system default extraction model. |
After upload, the backend runs the extraction LLM and emits structured data via the SDK’s onExtractionResult callback.
Backend Actions
In the Actions section, add side-effects that fire when the tool completes (or when a specific step completes — see Multi-Step Flows). Two action types:
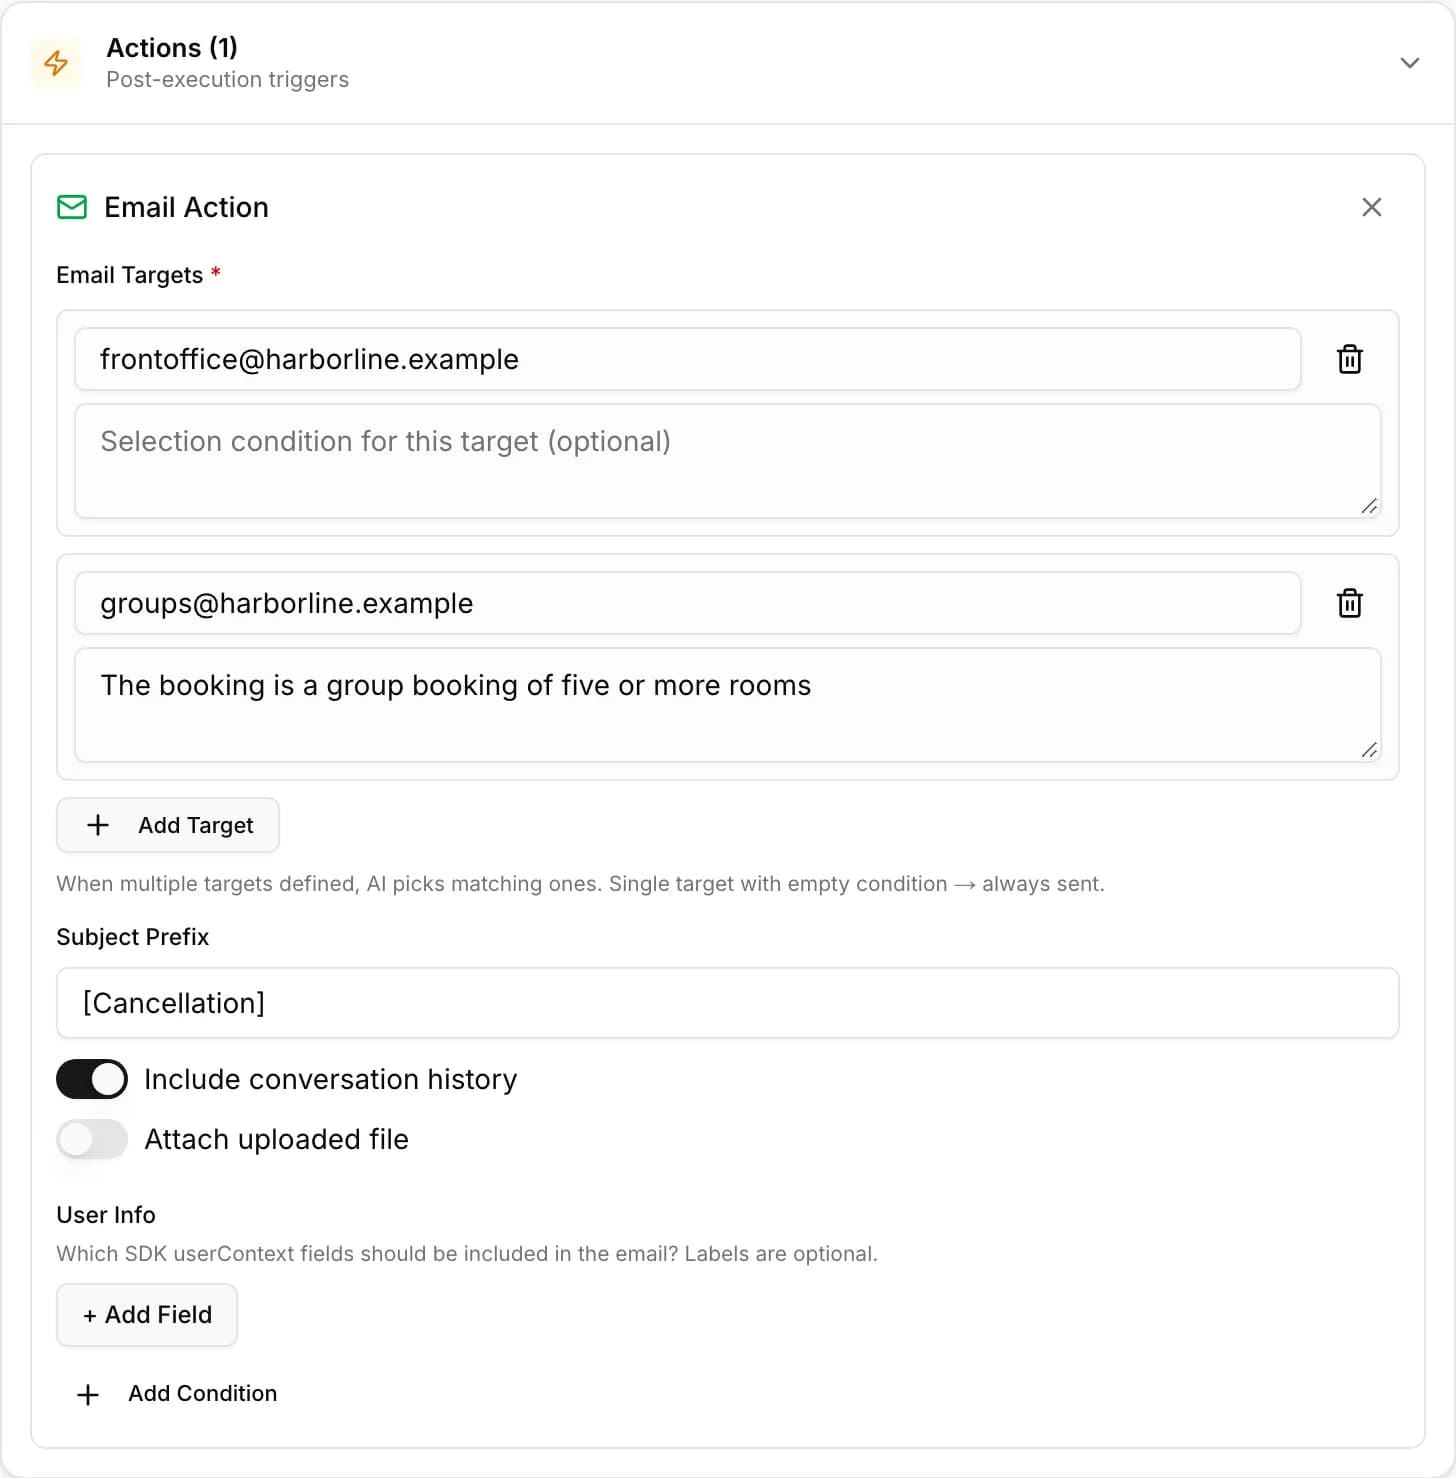
| Form field | What it does |
|---|---|
| Targets | One or more email + condition rows. Single target with no condition behaves like the simple “send to one address” case. Add multiple targets to route the same email to different inboxes based on per-target conditions — see Conditional Actions below. |
| Subject prefix | Prefix added to the auto-generated subject line. |
| Include conversation | Append the chat transcript to the email body. |
| Attach file | If the tool collected a file, attach it. |
| User context keys to include | Explicit allow-list of keys from the SDK’s runtime context to render as a “User Info” section. Anything not on this list isn’t included in the email. Default: empty (nothing forwarded). |
| Labels | Optional human-readable display labels for those keys. |
| Action condition | Optional natural-language condition. When set, the AI decides whether the entire action should fire. See Conditional Actions. |
When the tool has a Tracking ID Format set, the email body’s details block auto-renders a tracking-number row with the resolved value at the top — no admin config required. To surface it in the inbox listing as well, include {{tool.trackingId}} in the Subject prefix.
Webhook
Webhook actions POST a JSON (or multipart) payload to a partner endpoint — typically a CRM, ticketing system, or workflow automation. Every webhook delivery is recorded in Action Logs with a full request/response snapshot so you can audit, debug, and reproduce locally.
URL & Method
| Form field | What it does |
|---|---|
| URL | Endpoint to call. Supports template tokens — {{tool.trackingId}}, {{user.userId}}, etc. — resolved at runtime. |
| Method | POST or PUT. |
Custom Headers
Add arbitrary headers as key/value pairs — authentication (Authorization, X-API-Key), routing metadata, or tokenized values (header values support the same template tokens as the URL). Custom headers always win over the auto-set Qafka headers below.
Auto-Set Qafka Headers
Every webhook request also carries these headers without admin config:
| Header | Value | Purpose |
|---|---|---|
User-Agent | Qafka-Webhook/1.0 | Standard identification in the receiver’s access log. |
X-Qafka-Tool | The tool’s name | Lets the receiver branch by tool without parsing the body. |
X-Qafka-Tracking-Id | The tool’s tracking ID for this invocation | Mirrors the body’s trackingId field. |
X-Qafka-Delivery-Id | A fresh UUID per request | Idempotency key. |
X-Qafka-Timestamp | Unix seconds | Informational — when the request was sent. |
X-Qafka-Session-Id | The chat session ID | Correlates multiple tool invocations from the same conversation. |
X-Qafka-Signature | sha256=<hex> | Only sent when an HMAC secret is configured — see below. |
Payload
| Form field | What it does |
|---|---|
| Include extraction data | Sends the AI-extracted fields under the extraction key. On by default. |
| Include uploaded file | Sends the file the tool collected. Effect depends on the File Delivery Format below. |
| Include conversation history | Sends the full chat transcript under conversation. |
The payload always includes a top-level trackingId field when the tool has a tracking ID set, regardless of these toggles.
File Delivery Format
| Format | What goes on the wire | When to use |
|---|---|---|
url (default) | JSON body with file: { url, fileName, mimeType, size } — a signed URL the receiver downloads from. | Smallest payload; the receiver fetches the file asynchronously. |
base64 | JSON body with file: { data: "<base64>", fileName, mimeType, size } — the whole file is inlined. | Self-contained, ~33% size overhead, no streaming. Use for small files or receivers that can’t make outbound calls. |
formdata | multipart/form-data body. The file is a binary part; other fields ship as JSON-string parts. | Legacy receivers that expect form upload semantics. |
User Info
Allow-list of keys from the SDK’s runtime userContext to include in the webhook payload as a userContext object. Empty by default. Unlike the email action, webhook user context uses the raw key names (no display labels).
HMAC Signing Secret (optional)
When set, the runtime computes an HMAC-SHA256 of the request body using the secret as the key, hex-encodes it, and sends it as sha256=<hex> in the X-Qafka-Signature header. For a JSON request, the signed bytes are the JSON body itself; for a formdata request (file uploads — see File Delivery Format) the signed string is the canonical form formdata:<X-Qafka-Delivery-Id>:<JSON of the non-file fields>, since the wire format itself is multipart. The receiver verifies with the same secret to detect tampering with the payload. Recommended for any public-facing webhook. Note the timestamp header isn’t part of the signed bytes, so this doesn’t by itself protect against a captured request being resent — pair it with your own idempotency check on X-Qafka-Delivery-Id if that matters for your receiver.
Action Condition
Optional natural-language condition, same mechanism as the email action’s — see Conditional Actions.
Action results — success / failure / message — are delivered to the SDK via onActionResult. The full request and response snapshots (including masked auth headers, response status, response body) are captured in Action Logs.
Conditional Actions
Both action types support an Action condition — free-form natural-language text the AI evaluates against the tool’s parameters, the SDK’s userContext, and the conversation. If the condition isn’t met, the action is skipped and an entry is written to Action Logs with the AI’s reasoning. Examples:
"Only for complaint messages"— fire only when the AI judges the user is complaining"accountTier = premium"— deterministic field-equality form (admin friendly)"For users on the premium plan"— fuzzy semantic condition the AI resolves fromuserContext
The same evaluation happens in the same LLM call that produces the tool parameters — no extra round-trip, no extra latency.
Multi-Target Email Routing
A common case for email actions: route a single tool to different inboxes based on the request context. Add multiple Targets with per-target conditions; the AI picks the matching ones at runtime. Single tool, single action, N inboxes.
Targets are evaluated independently — write mutually-exclusive conditions for routing-style cases (one inbox), inclusive conditions for fan-out cases (notify multiple teams). When the AI cannot match any target on a multi-target email, the action is skipped (no broadcast) and the skip is logged.
Per-target conditions also work with a single target: the AI decides whether that one address gets the email, equivalent to setting an action-level condition.
Platform & Web Access
Two independent settings control where a tool is exposed:
| Setting | Options | Default | What it does |
|---|---|---|---|
| Platform | Web & App / Web only / App only | Web & App (on a single-channel plan, that channel — Web only or App only — and the selector is hidden) | Which surfaces (native app SDK vs. web) can see this tool at all. A tool saved without a platform at all (e.g. an AI-drafted tool) falls back to App only. |
| Web access | Open on web (incl. anonymous) / Closed on web — native/api-key only | Closed on web | Only meaningful when Platform includes Web. Choosing “Open on web” lets anonymous web visitors (snippet / CDN) see and use the tool — choose carefully for side-effecting tools (email, webhook, writes). |
There is currently no “identified” web trust tier: every web session is minted at the anonymous tier server-side, so “Closed on web” turns the tool off on web entirely — it never appears in chat even with the Web platform enabled. See Web SDK › Visitor Identity & Tools on Web for how this fits into the wider web visibility model.
Knowledge Documents
Link up to 3 Documents marked as tool knowledge to a tool. When the tool is selected for a turn, each linked document’s content is added to the prompt whole — it doesn’t depend on retrieval luck the way general grounding does. Use this for long rules, field dictionaries, or format examples that no longer fit comfortably in the Description field.
Each linked document is capped at 20,000 characters in the prompt; content beyond that is truncated. Only documents marked “tool knowledge” show up by default in the picker — turn on Show all to link any document (a document can be linked to a tool while remaining available for general answers, unless it’s marked tool-knowledge-only).
UI Rendering
The Response Configuration section tells the chat widget how to render the tool’s response. The outer settings (response type, data path, max items, layout, position) apply to BOTH renderer modes; the only choice is which renderer draws each item.
Common settings
| Form field | What it does |
|---|---|
| Response type | list, detail, card, table, or summary — controls iteration. list plus an array payload renders one card per item. |
| Data path | Dot-path into the response payload to find the actual items (e.g. data.items). Leave empty when the array is at the root. |
| Max items | Cap for list mode — extra items render as a “…and N more” footer. |
| Layout | vertical (stack) or horizontal (scrollable row). |
| Position | before (above the assistant message) or after (below). |
Item renderer — pick one
| Mode | When to use |
|---|---|
| Component (rendered in app) | Your app already has a polished component for this. Set “Item component” to its registry key and the SDK looks it up at render time. See Customizing Components for the SDK-side wiring, or run qafka sync to auto-generate a stub file with the right data shape. |
| Card (designed here) | No app code needed. Visually compose a layout from the primitive whitelist (QView, QText, QImage, QIcon, QDivider, QButton) using the JSON editor. AI generate + Modify + iPhone-frame live preview keep the loop fast. |
Card mode
Card mode availability depends on your plan — see Billing.
Selecting Card opens an inline editor inside the section:
- Slug + Label — internal identifier and human-readable name. Slug is unique per tool.
- Card definition (JSON) — the schema is
{ schemaVersion: 1, root: <node> }. Each node hascomponentplus its props at the same level. UsefieldNameto bind text/image leaves to fields in your tool result. Conditionally show ornaments withshowIf. - Sample data — paste a real example of what your tool returns. The preview binds against this; sample data persists alongside the card definition on save.
- Live preview — wrapped in an iPhone chrome so you see the card in roughly the proportions partners will. Buttons inside the preview are inert.
- AI designer —
Generateproduces 2 variants (Compact + Detailed) from the tool description and sample data;Modifyapplies a natural-language change to the current JSON; Undo walks back through the last 10 AI edits.
Card buttons can fire one of seven CTA types: external_navigation, deep_link, suggest_message, copy, dismiss, share, tool_trigger. Only copy, dismiss, and share have built-in SDK behavior. external_navigation, suggest_message, deep_link, and tool_trigger all cross the SDK boundary — they’re silently skipped unless the partner app registers the matching callback (see Card CTAs on the SDK side).
Tracking ID Format
The Tracking ID Format field generates a unique identifier per tool invocation. The same ID is shared across every action of that invocation — email subject, body, webhook payload, webhook headers, the AI’s user-facing reply, and the action log row.
| Behavior | What happens |
|---|---|
| Empty | Runtime auto-generates TRK-<base36 epoch>-<4 hex> per invocation. |
| Custom format | Whatever template string you write is resolved per invocation. Must contain at least one {{system.*}} token — that’s the only namespace that resolves here; a {{user.*}} token in a Tracking ID Format resolves to an empty string, so don’t use it for this field. A static string would produce the same ID for every invocation, which the validator rejects at save time. |
Where it shows up
- AI replies — write
{{tool.trackingId}}inside the tool’s Description and the AI quotes the same ID in its reply. - Email body — auto-rendered as a tracking-number row at the top of the details block.
- Email subject — write
{{tool.trackingId}}inside the Subject prefix to surface it in inbox listings. - Webhook payload — sent as a top-level
trackingIdfield on every webhook delivery. - Webhook headers — sent as
X-Qafka-Tracking-Idautomatically. - Action log — searchable from the Action Logs page.
Risk & Confirmation
| Form field | What it does |
|---|---|
| Risk level | low, medium (“requires confirmation”), or high. Recorded with the tool for your own reference. |
| Requires confirmation | A toggle recorded with the tool for your own reference. |
Custom Data
The Custom Data field is a free-form JSON blob that travels with the tool to the SDK. Use it to pass partner-specific configuration so the app’s onToolSuggested handler can stay generic across tools.
Available In / Enabled
| Form field | What it does |
|---|---|
| Available in | Text + Voice, Text only, or Voice only. Projects without voice access are locked to text. Note that only Custom and Custom with AI tools actually run in voice — see Voice and Handling Tools. |
| Enabled | Toggle a tool off without deleting it. Disabled tools are not sent to the AI for matching. |
Status, Versions, and the Response Channel
Beyond the fields above, three areas of tool behavior live on their own pages:
- Status — every version carries a Draft / Staging / Published label, shown as a segmented control once the tool has one (see Creating a Tool for when that happens): Draft is hidden from everyone; Staging is visible only to TEST-key sessions; Published is visible to everyone. The Enabled toggle (see Available In / Enabled) gates visibility independently of this — both have to allow it for the assistant to see the tool. See Versions for the full lifecycle, including per-version rollout by app version (Min Client) and the “which version does this client get” simulator.
- Create with AI — describe a tool idea in plain language and let AI draft it. See Create with AI.
- Response Channel — an optional operator reply queue for tools that need a human to follow up after the tool fires. See Response Channel.